I start by removing my nail polish. Personally I use non acetone remover, and I think it's just personal preference. I use a homemade hand scrub that I will share with you later. I use my four sided file to buff and shape my nails. I always have one that gets chipped through the week. I'm horribly careless with my nails, and tend to use them as tools. I give them a quick rinse under warm water and pat dry. ON TO THE FUN PART!
I love natural stones! All of my favorite pieces are natural stones. As a child, my father wore two rings, his wedding ring, and this sterling silver ring in the shape of a horse shoe, with a large turquoise stone in it. I would sit on his lap and run my fingers over the silver and the soft coolness of the stone. As I grew up, my mother loved diamonds, and I remember going into her jewelry box (sneaking I should say). I would open up her maroon snakeskin jewelry box, where she kept her rings, and they were always diamonds. As an adult, I keep the diamond for my wedding ring (even though we are considering changing that as well) and fill my other's with some of my favorites. My large turquoise knuckle ring is what inspired this weeks nail makeover!
I always start with a base coat. I really like Sally Hansen's Clear for Take Off. It leaves a really adhesive base coat for further layers. Then I put on my base coat, I used Wet N' Wild's I need a refresh-MINT.
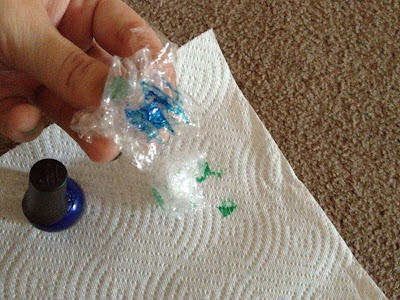
After I finished laying the base coat, I allowed it to dry and applied a clear topcoat. I like Sally Hansen's Hard as Nails. Once completely dry I laid out a piece of wax paper, and gathered several pieces of plastic wrap. I rolled up the plastic wrap in balls, and applied a layer of Forever21's Emerald Green. I dabbed the excess on the wax paper before stamping it over my nails.
After that layer was completely dry, I used the same technique only using Finger Paints Cerulean Seascape.
I finally dabbed a q-tip into nail polish remover, removing as much of the polish from my skin as possible. I used 2 coats of Sally Hansen's Hard as Nails and called it good!
I'm really happy with how these turned out, and was excited to share! My nails have taken a serious beating because of all the home renovation we have been doing. I've been considering trying out a shellac at the local salon, but truthfully don't seem to have the time to do that.
What do you think?


No comments:
Post a Comment